分类 管理维护 下的文章

[root@localhost ~]# service mysqld start
Another MySQL daemon already running with the same unix socket.
正在启动 mysqld: [失败]

尝试重启,出现如下错误

[root@localhost ~]# /etc/init.d/mysqld status
mysqld 已停

可以执行该命令修复

mv /var/lib/mysql/mysql.sock /var/lib/mysql/mysql.sock.bak

参考:http://bbs.csdn.net/topics/390662731?page=1#post-396281623

下午在一台centos上折腾,用到mysql的时候发现root密码忘记了,很久没上了……
如果有centos root权限的话,可以尝试跳过验证修密码,具体操作如下。

(mysql如果是通过 yum 安装的,可以用 rpm -ql mysql (usr/bin) 查找安装路径)

# /etc/init.d/mysqld stop
# mysqld_safe --user=mysql --skip-grant-tables --skip-networking &
# mysql -u root mysql
mysql> UPDATE user SET Password=PASSWORD('newpassword') where USER='root';
mysql> FLUSH PRIVILEGES;
mysql> quit
# /etc/init.d/mysqld restart
# mysql -uroot -p
Enter password:
mysql>

下载地址:http://pkgs.repoforge.org/p7zip/

CentOS 5.x 32位

# wget http://pkgs.repoforge.org/p7zip/p7zip-9.20.1-1.el5.rf.i386.rpm
# rpm -ivh p7zip-9.20.1-1.el5.rf.i386.rpm

CentOS 5.x 64位

# wget http://pkgs.repoforge.org/p7zip/p7zip-9.20.1-1.el5.rf.x86_64.rpm
# rpm -ivh p7zip-9.20.1-1.el5.rf.x86_64.rpm

CentOS 6.x 32位

# wget http://pkgs.repoforge.org/p7zip/p7zip-9.20.1-1.el6.rf.i686.rpm
# rpm -ivh p7zip-9.20.1-1.el6.rf.i686.rpm

CentOS 6.x 64位

# wget http://pkgs.repoforge.org/p7zip/p7zip-9.20.1-1.el6.rf.x86_64.rpm
# rpm -ivh p7zip-9.20.1-1.el6.rf.x86_64.rpm

参考: http://teddysun.com/176.html

以root登入,或者su root

# yum install "@Chinese Support"

完成安装后回到桌面进行设置:system -> preferences -> input method

附:在ibus-pinyin里使用搜狗词库

# wget http://hslinuxextra.googlecode.com/files/sougou-phrases-full.7z
# 7za x sougou-phrases-full.7z
# cp ibus/android.db /usr/share/ibus-pinyin/db/android.db
# 输入y确认覆盖

更新系统内核到最新

yum -y update

系统更新后,如果yum安装时提示错误信息,请执行以下命令修复.

rpm –import /etc/pki/rpm-gpg/RPM-GPG-KEY*

安装Apache,PHP,MySQL,以及扩展

yum -y install httpd php mysql mysql-server php-mysql httpd-manual mod_ssl mod_perl mod_auth_mysql php-mcrypt php-gd php-xml php-mbstring php-ldap php-pear php-xmlrpc mysql-connector-odbc mysql-devel libdbi-dbd-mysql

ZPanelcp使用apache,我们可以优化下它的性能,增加防cc的模块,以防止出现万一。

mod_evasive 是Apache的防DDOS模块。可以比较有效的防止CC攻击等,虽然不能完全阻止,但一定程度上可以缓解Apache的压力。配置也比较简单,下面有相关说明,可根据自己服务器情况配置。

安装

wget http://www.zdziarski.com/blog/wp-content/uploads/2010/02/mod_evasive_1.10.1.tar.gz
tar zxvf mod_evasive_1.10.1.tar.gz
cd mod_evasive
/usr/sbin/apxs -i -a -c mod_evasive20.c

如果mod_evasive模块已正确安装,会自动添加到httpd.conf
/etc/httpd/conf/httpd.conf 会有下面这行

LoadModule evasive20_module /usr/lib/httpd/modules/mod_evasive20.so

配置

vi /etc/httpd/conf/httpd.conf

#键盘:Ctrl + G
#跳转到文档底部,添加以下内容

#17/12/2013 Add
<IfModule mod_evasive20.c>
DOSHashTableSize 512
DOSSiteCount 50
DOSPageCount 2
DOSPageInterval 1
DOSSiteInterval 1
DOSBlockingPeriod  3600
DOSEmailNotify youemail@qq.com
DOSSystemCommand "sudo iptables -A INPUT -s %s -j DROP"
DOSLogDir "/tmp"
DOSWhiteList 127.0.0.
</IfModule>

mod_evasive 的官方地址: http://www.zdziarski.com

相关参数
DOSHashTableSize 3097:定义哈希表大小。
DOSSiteCount 50:允许客户机的最大并发连接。
DOSPageCount 2:允许客户机访问同一页的间隔。
DOSPageInterval 1:网页访问计数器间隔。
DOSSiteInterval 1:全站访问计数器间隔。
DOSSiteInterval 60:加入黑名单后拒绝访问时间。
DOSEmailNotify xxxx@gmail.com:有IP加入黑名单后通知管理员。
DOSSystemCommand "sudo iptables -A INPUT -s %s -j DROP":IP加入黑名单后执行的系统命令。
DOSLogDir "/tmp":锁定机制临时目录。
DOSWhiteList 127.0.0.1:防范白名单,不阻止白名单IP。

环境 CentOS 6.3 64bit

安装libunwind库(32位系统可省略次步)

wget http://download.savannah.gnu.org/releases/libunwind/libunwind-0.99-alpha.tar.gz

tar zxvf libunwind-0.99-alpha.tar.gz

cd libunwind-0.99-alpha/

CFLAGS=-fPIC ./configure

make CFLAGS=-fPIC

make CFLAGS=-fPIC install

安装Tcmalloc

wget http://gperftools.googlecode.com/files/gperftools-2.0.tar.gz

tar zxvf  gperftools-2.0.tar.gz

cd gperftools-2.0/

./configure

make && make install

echo "/usr/local/lib" > /etc/ld.so.conf.d/usr_local_lib.conf

/sbin/ldconfig

编译完成后,我们编辑mysqld_safe文件,加入Tcmalloc部分。

vi /usr/bin/mysqld_safe

# 找到# executing mysqld_safe,在下面加入:
export LD_PRELOAD=/usr/local/lib/libtcmalloc.so

# 保存,退出,重启MySQL。
service mysqld restart

检查是否加载成功,运行:lsof -n | grep tcmalloc
显示如下类似内容即Ok

mysqld 32573 mysql mem REG 9,3 13771446
/usr/local/lib/libtcmalloc.so.4.1.0 (path dev=0,53)

修改配置文件

运行:

vi /etc/my.cnf

全选替换为:

[mysqld]
datadir=/var/lib/mysql
socket=/var/lib/mysql/mysql.sock
user=mysql
# Disabling symbolic-links is recommended to prevent assorted security risks
symbolic-links=0

# 12/17/2013 Add
local-infile=0
skip-locking
query_cache_limit=1M
query_cache_size=32M
query_cache_type=1
max_connections=500
interactive_timeout=100
wait_timeout=100
connect_timeout=10
thread_cache_size=128
key_buffer=16M
join_buffer=1M
max_allowed_packet=16M
table_cache=1024
record_buffer=1M
sort_buffer_size=2M
read_buffer_size=2M
max_connect_errors=10
# Try number of CPU's*2 for thread_concurrency
thread_concurrency=2
myisam_sort_buffer_size=64M
server-id=1

[mysqld_safe]
log-error=/var/log/mysqld.log
pid-file=/var/run/mysqld/mysqld.pid
open_files_limit=8192

[mysqldump]
quick
max_allowed_packet=16M

[mysql]
no-auto-rehash
#safe-updates

[isamchk]
key_buffer=64M
sort_buffer=64M
read_buffer=16M
write_buffer=16M

[myisamchk]
key_buffer=64M
sort_buffer=64M
read_buffer=16M
write_buffer=16M

[mysqlhotcopy]
interactive-timeout

以上配置可根据自己服务器情况修改参数!
最后保存退出,运行 service mysqld restart 重启MySQL,完成。

查看httpd错误日记:/var/log/httpd/error_log

[Tue Dec 17 18:47:11 2013] [notice] Digest: done
Failed loading /usr/local/lib/ioncube/ioncube_loader_lin_5.3.so: /usr/local/lib/ioncube/ioncube_loader_lin_5.3.so: wrong ELF class: ELFCLASS32
eAccelerator: Could not allocate 67108864 bytes, the maximum size the kernel allows is 33554432 bytes. Lower the amount of memory request or increase the limit in /proc/sys/kernel/shmmax.
PHP Warning: [eAccelerator] Can not create shared memory area in Unknown on line 0
PHP Fatal error: Unable to start eAccelerator module in Unknown on line 0

知道问题就好办了

vi /etc/php.d/eaccelerator.ini

eaccelerator.shm_size 把值改成15(根据自己服务器配置修改)

# 按下 Esc 键退出编辑

:wq

#保存退出

本文内容转载:http://yzpanel.duapp.com/
需要更多详细内容,请访问原作者网站。

安装PHP加速器eAccelerator

yum install make
wget -c http://yzpanel.duapp.com/down/eaccelerator-0.9.6.1.tar.bz2
tar xjf eaccelerator-0.9.6.1.tar.bz2
cd eaccelerator-0.9.6.1
/usr/bin/phpize
./configure -enable-eaccelerator=shared -with-php-config=/usr/bin/php-config
make
make install
cd /
rm -rf eaccelerator-0.9.6.1
rm -rf eaccelerator-0.9.6.1.tar.bz2
mkdir /tmp/eaccelerator
chmod 777 /tmp/eaccelerator

cd /etc/php.d/

wget http://yzpanel.duapp.com/down/eaccelerator/Xen-eaccelerator.ini
mv Xen-eaccelerator.ini eaccelerator.ini

wget http://yzpanel.duapp.com/down/eaccelerator/OPENVZ-eaccelerator.ini
mv OPENVZ-eaccelerator.ini eaccelerator.ini

这一步二选择一即可,根据实际情况选择Xen架构就下载Xen-eaccelerator.ini;OPENVZ架构就下载OPENVZ-eaccelerator.ini

安装 ionCube

cd /
wget -c http://yzpanel.duapp.com/down/ioncube_loaders_lin_x86.zip
unzip ioncube_loaders_lin_x86
mv ioncube /usr/local/lib/
编辑文件/etc/php.ini 添加
zend_extension = "/usr/local/lib/ioncube/ioncube_loader_lin_5.3.so"

安装 Zend Guard Loader

cd /root
wget http://downloads.zend.com/guard/5.5.0/ZendGuardLoader-php-5.3-linux-glibc23-x86_64.tar.gz
sudo mkdir /usr/zend
tar -zxvf ZendGuardLoader-php-5.3-linux-glibc23-x86_64.tar.gz
sudo cp /root/ZendGuardLoader-php-5.3-linux-glibc23-x86_64/php-5.3.x/ZendGuardLoader.so /usr/zend/

编辑文件/etc/php.ini 
在zend_extension = "/usr/local/lib/ioncube/ioncube_loader_lin_5.3.so" 后面添加

zend_extension=/usr/zend/ZendGuardLoader.so
zend_loader.enable=1
zend_loader.disable_licensing=0
zend_loader.obfuscation_level_support=3
zend_loader.license_path=

安装完成之后 service httpd restart 重启httpd服务 然后用php -v查看是否安装成功

ZPanelcp是国外的虚拟主机控制面板,简单易用,界面美观,支持Debian,Ubuntu,CentOS,FreeBSD,Windows系统!官方有一键安装包,默认集成安装ProFTPD、MySQL、phpMyadmin、WebMail、DNS模块。占用内存也比较少,大概100M左右。官方有汉化语言包,还有很多的扩展模块,甚至有计费模块,如果要开展虚拟主机业务都不用买WHMCS了。如果有时间,接下来会接着发一些关于ZPanelcp的文章。

安装 - 环境 CentOS 6.3 64bit

wget http://www.zvps.co.uk/sites/default/files/downloads/centos-6-3/package/installer-x86_64-install.sh.x.tar.gz
tar -xf installer-x86_64-install.sh.x.tar.gz
chmod +x installer-x86_64-install.sh.x
yum install ld-linux.so.2
./installer-x86_64-install.sh.x

以上命令执行完成后会显示如下:

To contine please agree to the GPL license (y/n/q)? y (这里输入y同意许可协议)
Find your timezone from : http://php.net/manual/en/timezones.php e.g Europe/London
Enter Your Time Zone: Asia/Chongqing (这里输入Asia/Chongqing使用亚洲时区)
Install fresh ZPanel server or enter an upgrade version number e.g 10-1-0 :install (这里直接回车)
Enter the FQDN of the server (example: zpanel.yourdomain.com): (主机名默认即可这里直接回车,也可以输入)
Enter the Public (external) IP of the server: 输入IP (公网IP地址输入你的独立IP)
MySQL Password is currently blank, please change it now.
Password you will use for MySQL: 输入phpMyadmin管理密码 (mysql的root密码)
Re-enter the password you will use for MySQL: 再次输入输入phpMyadmin管理密码 (再次输入mysql的root密码)
ZPanel will now install, are you sure (y/n/q)? y (y开始安装)

完成以上操作后会自动进行安装,安装完成后会显示系统管理员密码,保存在 /root/passwords.txt 。之后访问服务器IP即可登入系统,用户是zadmin。

安装ZPanel中文汉化语言包

zppy repo add zpanel-packages.sammottley.co.uk
zppy update
zppy install ZXTS

在Server Admin->Module Admin下开启 在Administrator下打上勾

在Server Admin菜单下就能看到ZXTS了点击进入找到Mandarin -> Install or Update 进入安装下载 提示:Translations was added successfully

在My Account->Choose Language:选择Mandarin->Update Account 这里最好全都修改为你的信息因为如果Email不修改会报错不能保存。

安装K-File Manager文件管理器

zppy repo add rustus.txt-clan.com
zppy update
zppy install kfm

安装好后到模块管理勾选,允许用户使用。

来看看现在的样子吧。
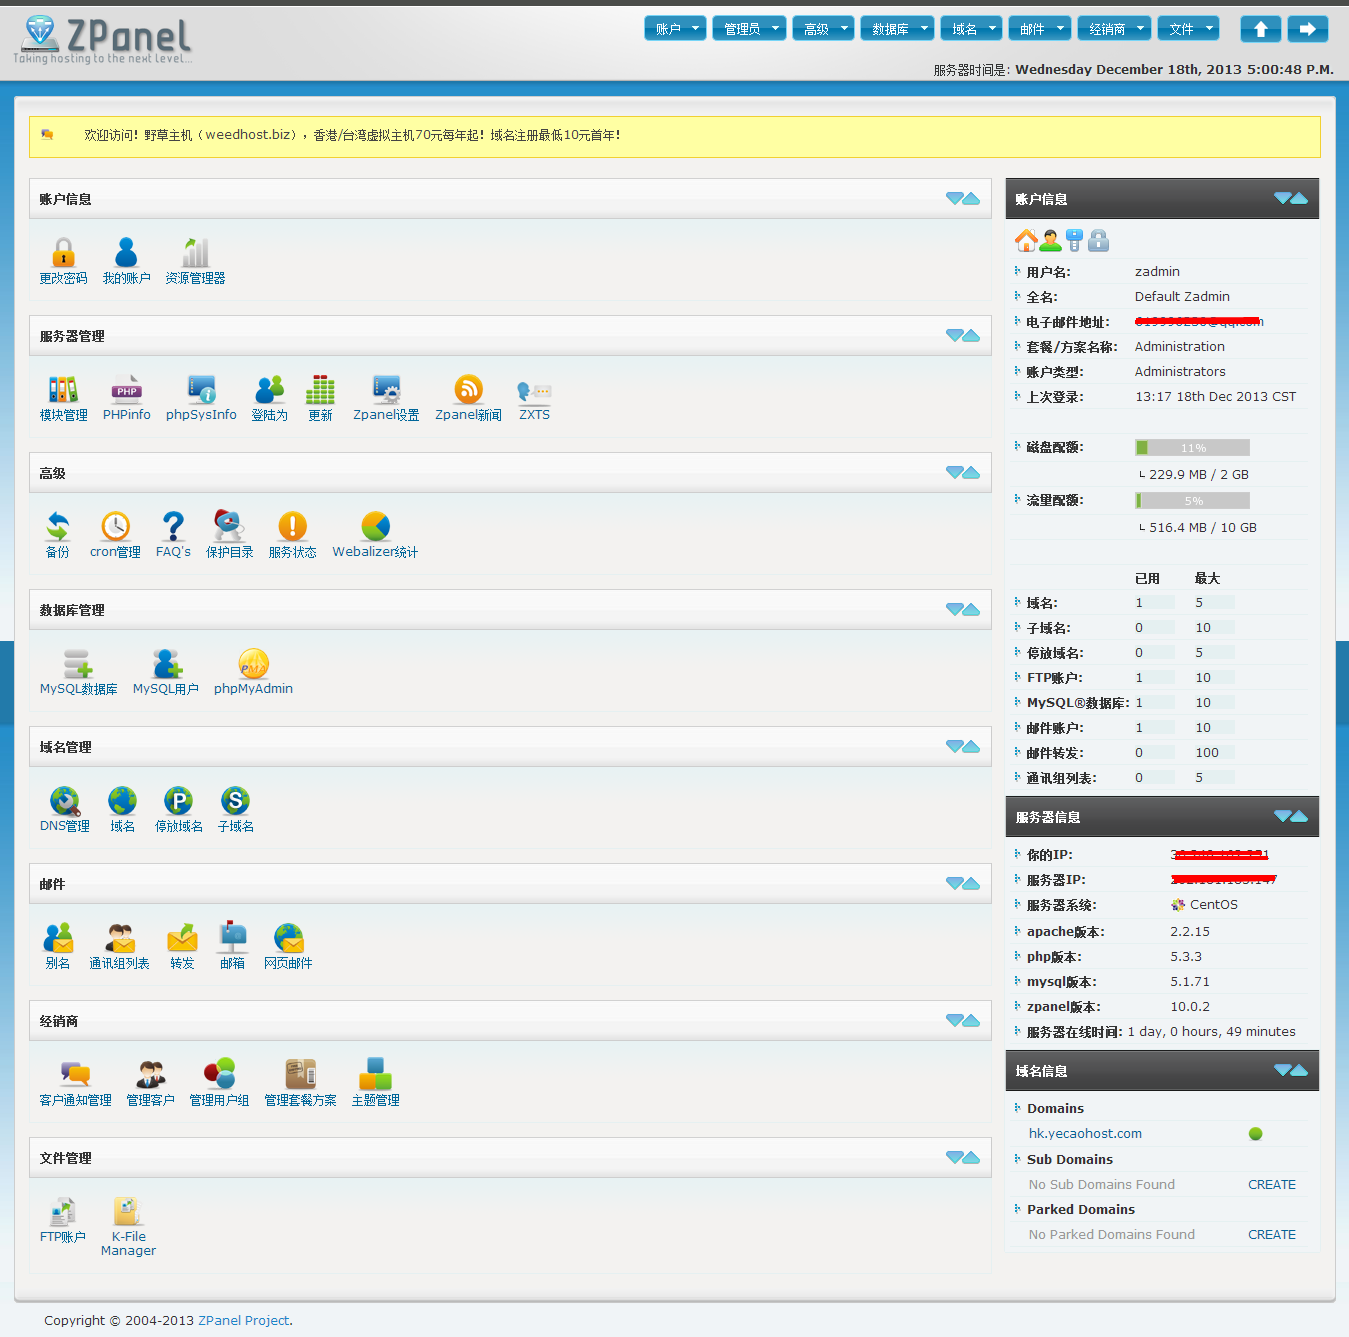
ZPanel

官方网站:http://www.zpanelcp.com/
官方论坛:http://forums.zpanelcp.com/index.php
张永鹏ZPanel的教程:http://yzpanel.duapp.com/