分类 系统安全 下的文章

刚刚收到警告通知,一台机器的宽带使用率异常。通过top和ps aux等却看不出异常用户,负载正常;且低于常规。通过iftop看到基本都是一个IP在发送数据出去,请求数据的IP(攻击IP)有十多个段,封锁了请求IP后。查了下这些IP是CloudFlare和百度云加速的,很明显是被CC但CloudFlare和百度云加速没过滤掉发送给后端了。

发送数据的IP(被攻击网站IP)是共享的,下面有很多网站,直接封这IP会导致这IP下的所有网站挂掉。所以只能找到具体被攻击的网站和用户进一步操作,一个个看明显是不可能的。

DirectAdmin 用户的每个网站都有单独的apache日记,我们可以根据这特性,把请求数据持续时间相对长、大的ip拿出来,对所有用户的网站日记进行过滤搜索。

[root@****** ~]# grep -c 141.101.98.211 /var/log/httpd/domains/*.log | grep -v :0

/var/log/httpd/domains/****1g.com.log:1
/var/log/httpd/domains/****1g.com.error.log:30
/var/log/httpd/domains/****xv.com.log:12266

[root@****** ~]# grep -c 162.158.88.52 /var/log/httpd/domains/*.log | grep -v :0
/var/log/httpd/domains/****xv.com.log:6385

只拿出2个IP就找到了,很明显的是:****xv.com,然后具体检查该网站日记,发现从凌晨1点30分开始,到50分拒绝百度加速的请求,其实封十几个段还只是部分,这之间GET请求量已经有35万多次了,请求的IP数量未统计,非常之多,尾巴也是特别随机定制为穿透百度CDN的。之后联系到该用户,要求马上把百度云加速CC防护开到最高。然后解除刚刚封锁的IP段恢复该CDN的正常请求。算是解决了。

也许会问为什么服务器本身不能做防护?这次是比较特殊的,用户使用CDN隐藏了后端真实IP,所以攻击者不能直接对我们进行攻击,而是请求CDN,最终导致宽带占用异常的是CDN的IP,同样我们也无法正确获取到攻击者的IP,也无法对真实攻击者ip进行屏蔽,当然有方案可以做到,但我们屏蔽并没有用,CDN还是会放行;除非获取到真实攻击IP后反扑。CDN很多在用,我们肯定是不能封的。即使制定规则丢弃CC请求返回301给CDN,结局也是一样的;因为请求不会因此停止和减少,会继续对301页面请求,因为量大,宽带占用率并不会下降。只能与用户共同处理该问题。

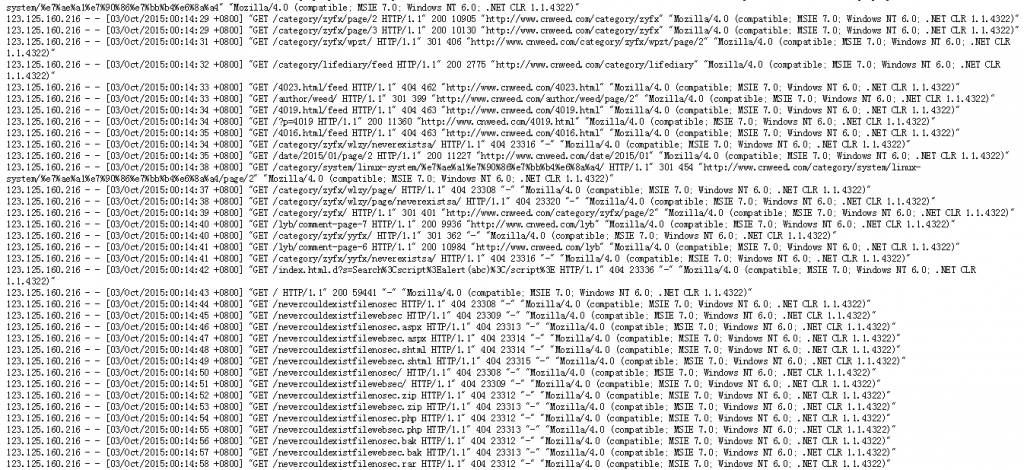
404

如图,有时候我们检查Apache日记的时候会发现大量这样的单IP或多IP在短时间内请求大量不存在的目录/文件,Apache返回404状态,这不仅消耗服务器资源还可能有安全隐患。我们可以通过CSF防火墙解决,CSF可以根据返回状态次数来屏蔽请求IP访问,相关设置和说明:

# This option will keep track of the number of "File does not exist" errors in
# HTACCESS_LOG. If the number of hits is more than LF_APACHE_404 in LF_INTERVAL
# seconds then the IP address will be blocked
#
# Care should be used with this option as it could generate many
# false-positives, especially Search Bots (use csf.rignore to ignore such bots)
# so only use this option if you know you are under this type of attack
#
# A sensible setting for this would be quite high, perhaps 200
#
# To disable set to "0"
LF_APACHE_404 = "200"

# If this option is set to 1 the blocks will be permanent
# If this option is > 1, the blocks will be temporary for the specified number
# of seconds
LF_APACHE_404_PERM = "3600"

Server Shield是一款轻量级的系统保护和强化工具

它的功能包括:

Firewall Hardening 防火墙强化
TCP Hardening TCP强化
Data Leakage Protection 防泄保护
ICMP/Ping Flood Protection ICMP/Ping攻击保护
Rootkit Protection Rootkit保护
DoS Protection DDOS保护
Spoof Protection Spoof保护
Bogus TCP Protection Bogus TCP保护
SYN Flood Protection 洪水攻击保护
FTP/SSH 暴力破解保护
等……

依赖软件

yum-security
iptables
net-tools
sed
gawk
git

安装

git clone https://github.com/bluedragonz/server-shield

cd server-shield;chmod +x sshield;mv sshield /etc/init.d

/etc/init.d/sshield start    

项目地址:https://github.com/bluedragonz/server-shield

安装教程

cd /usr/local/src
wget http://techsware.in/downloads/harden.sh
chmod 755 harden.sh
./harden.sh 

1:什么是KalluscPHarden?
答:KalluscPHarden是一个shell脚本,基于cPanel服务器安全加固、检查。

2:会为cPanel做什么?
答:改变调整设置,密码修改强度,后台进程检查,编译器的访问安全,Shell Bomb Fork保护等设置....

3:有什么额外的应用程序将安装到服务器?
答:CSF,CMM,CMQ,CMC,Maldet,Rkhunter,Linux Socket 监控,Linux的环境安全等

4:服务器会有哪些地方被调整/加固?
答:Apache,cPanel,FTP,SSH,MySQL,CSF,PHP等

5: What additional hardening steps it does ?
Ans : TMP hardening, Logrotate hardening, Daily Rkhunter scanning, rDNS Check, Disable unwanted processes, SYN FLOOD Kernel Tweak, etc

6: How to recover the old configuration, before running this tool?
Ans : All configurations will be backup as conf_file.beforetweak before making changes to it. So you can compare the configurations in you want to check anything.

7: Any more tweaks it do ?
Ans : Check change log for recent changes to the script

8:这个脚本多少钱?
答:它是完全免费的。

9:想知道更多?
Ans : Please feel free to reach me at kallu[at]techsware.in

官方主页:http://techsware.in/kcpharden.html

SYNFLOOD is disabled by default. If you are not receiving any sort of attack, there is no need to enable it. If you are expecting an attack, enable it and set the rules a bit strict, like

SYNFLOOD_RATE = "5/s"
SYNFLOOD_BURST = "3"

i.e. if 5 connections are received from an IP/sec for 3 times, block it. Make sure don't keep it too strict if you are not receiving an attack else it will generate false positives and will block legit connections.

摘自:http://www.webhostingtalk.com/showthread.php?t=892958

ELS stands for Easy Linux Security. ELS was created by Richard Gannon, Martynas Bendorius and Wael Isa. ELS takes many of the tasks performed by our Administrators and puts it into an easy to use program for anyone to use. It is released under the GNU/GPL so it is free to use.

This program is always being improved with new features and bugfixes, so be sure to keep it up to date. If you found a bug or would like an improvement, please let us know! If you really like this program, donations are welcome!

支持的操作系统 :

* Red Hat Linux
* Red Hat Enterprise Linux
* Fedora Core
* CentOS
* Debian

ELS 有哪些功能:

* Install RKHunter
* Install RKHunter Cronjob which emails a user-set email address nightly
* Install/update APF
* Install/update BFD
* Install CHKROOTKIT
* Install CHKROOTKIT Cronjob which emails a user-set email address nightly
* Disable Telnet
* Force SSH Protocol 2
* Secure /tmp
* Secure /var/tmp
* Secure /dev/shm
* 安装/升级 Zend Optimizer
* 安装/升级 eAccelerator
* MySQL 4.1 and 5.0 Configuration Optimization
* Upgrade MySQL to 5.0
* Tweak WHM Settings for security and stability
* Configure RNDC if not already done (cPanel only)
* Change SSH port (also configure APF as necessary)
* Add wheel user and disable direct root login over SSH
* 优化 MySQL tables
* 安装/升级 Libsafe
* 安装/升级 ImageMagick (from latest source)
* Uninstall LAuS
* Harden sysctl.conf
* Install Chirpy’s Free Exim Dictionary Attack ACL (cPanel only)
* 更多!

安装 ELS, 以ROOT身份运行以下命令:

wget -O installer.sh http://els.web4host.net/installer.sh
chmod +x installer.sh
sh installer.sh

官方网站:http://www.web4host.net/easy-linux-security/

netstat 工具来检测SYN攻击

# netstat -n -p -t
tcp0 0 10.11.11.11:23124.173.152.8:25882 SYN_RECV-
tcp0 0 10.11.11.11:23236.15.133.204:2577 SYN_RECV-
tcp0 0 10.11.11.11:23127.160.6.129:51748 SYN_RECV-

LINUX系统中看到的,很多连接处于SYN_RECV状态(在WINDOWS系统中是SYN_RECEIVED状态), 源IP地址都是随机的,表明这是一种带有IP欺骗的SYN攻击。

# netstat -n -p -t | grep SYN_RECV | grep :80 | wc -l
324

查看在LINUX环境下某个端囗的未连接队列的条目数,显示TCP端囗22的未连接数有324个,虽然还远达不到系统极限,但应该引起管理员的注意。

[root@pub wxjsr]# netstat -na | grep SYN_RECV
tcp 0 0 58.193.192.20:80 221.0.108.162:32383 SYN_RECV
tcp 0 0 58.193.192.20:80 125.85.118.231:2601 SYN_RECV
tcp 0 0 58.193.192.20:80 222.242.171.215:2696 SYN_RECV
tcp 0 0 58.193.192.20:80 116.52.10.51:2629 SYN_RECV
tcp 0 0 58.193.192.20:80 218.171.175.157:1117
[root@pub wxjsr]# netstat -na | grep SYN_RECV |wc
11 66 979

查看系统SYN相关的配置

Linux内核提供了若干SYN相关的配置,用命令: sysctl -a | grep syn

[root@metc apache2]# /sbin/sysctl -a | grep syn
net.ipv6.conf.default.max_desync_factor = 600
net.ipv6.conf.all.max_desync_factor = 600
net.ipv6.conf.eth0.max_desync_factor = 600
net.ipv6.conf.lo.max_desync_factor = 600
net.ipv4.netfilter.ip_conntrack_tcp_timeout_syn_recv = 60
net.ipv4.netfilter.ip_conntrack_tcp_timeout_syn_sent = 120
net.ipv4.tcp_max_syn_backlog = 1280
net.ipv4.tcp_syncookies = 1
net.ipv4.tcp_synack_retries = 2
net.ipv4.tcp_syn_retries = 5
fs.quota.syncs = 18

防范SYN攻击设置

#缩短SYN- Timeout时间:

iptables -A FORWARD -p tcp --syn -m limit --limit 1/s -j ACCEPT
iptables -A INPUT -i eth0 -m limit --limit 1/sec --limit-burst 5 -j ACCEPT

#每秒 最多3个 syn 封包 进入 表达为 :

iptables -N syn-flood
iptables -A INPUT -p tcp --syn -j syn-flood
iptables -A syn-flood -p tcp --syn -m limit --limit 1/s --limit-burst 3 -j RETURN
iptables -A syn-flood -j REJECT

#设置syncookies:

sysctl -w net.ipv4.tcp_syncookies=1
/sbin/sysctl -w net.ipv4.tcp_max_syn_backlog=3000
/sbin/sysctl -w net.ipv4.tcp_synack_retries=1
/sbin/sysctl -w net.ipv4.tcp_syn_retries=1
sysctl -w net.ipv4.conf.all.send_redirects=0
sysctl -w net.ipv4.conf.all.accept_redirects=0
sysctl -w net.ipv4.conf.all.forwarding=0
/sbin/sysctl -w net.ipv4.icmp_echo_ignore_broadcasts=1
/sbin/sysctl -w net.ipv4.conf.default.accept_source_route=0 # 禁用icmp源路由选项
/sbin/sysctl -w net.ipv4.icmp_echo_ignore_broadcasts=1 # 忽略icmp ping广播包,应开启
/sbin/sysctl -w net.ipv4.icmp_echo_ignore_all=1 # 忽略所有icmp ping数据,覆盖上一项

转载:http://www.tuicool.com/articles/m6nE3q

cat>>/home/cc.sh< #!/bin/sh
status=`netstat -na|awk '$5 ~ /[0-9]+:[0-9]+/ {print $5}' |awk -F ":" -- '{print $1}' |sort -n|uniq -c |sort -n|tail -n 1`
NUM=`echo $status|awk '{print $1}'`
IP=`echo $status|awk '{print $2}'`
result=`echo "$NUM > 150" | bc`
if [ $result = 1 ]
then
echo IP\:$IP is over $NUM, BAN IT!
echo $(date +"%y-%m-%d") `uptime`
/sbin/iptables -I INPUT -s $IP -j DROP
fi
EOF
ln -sf /usr/bin/apt-get /usr/bin/yum
yum install -y bc

执行/home/cc.sh即可! 也可以将执行脚本加入到Cron执行!

转载:http://www.jb4.net/archives/74.html

什么是HttpGuard

HttpGuard是基于openresty,以lua脚本语言开发的防cc攻击软件。而openresty是集成了高性能web服务器Nginx,以及一系列的Nginx模块,这其中最重要的,也是我们主要用到的nginx lua模块。HttpGuard基于nginx lua开发,继承了nginx高并发,高性能的特点,可以以非常小的性能损耗来防范大规模的cc攻击。
下面介绍HttpGuard防cc的一些特性。

  1. 限制访客在一定时间内的请求次数
  2. 向访客发送302转向响应头来识别恶意用户,并阻止其再次访问
  3. 向访客发送带有跳转功能的js代码来识别恶意用户,并阻止其再次访问
  4. 向访客发送cookie来识别恶意用户,并阻止其再次访问
  5. 支持向访客发送带有验证码的页面,来进一步识别,以免误伤
  6. 支持直接断开恶意访客的连接
  7. 支持结合iptables来阻止恶意访客再次连接
  8. 支持白名单功能
  9. 支持根据统计特定端口的连接数来自动开启或关闭防cc模式

github项目地址:https://github.com/centos-bz/HttpGuard
联系作者:admin#centos.bz
赞助作者持续开发:查看支付宝条码

开始部署HttpGuard

一、安装openresty或者nginx lua

假设我们把HttpGuard安装到/data/www/waf/,当然你可以选择安装在任意目录,nginx运行的用户为www。

cd /data/www
wget --no-check-certificate https://github.com/centos-bz/HttpGuard/archive/master.zip
unzip master.zip
mv HttpGuard-master waf
chown www waf/logs

三、生成验证码图片(可选)

为了支持验证码识别用户,我们需要先生成验证码图片。生成验证码图片需要系统安装有php,以及php-gd模块。

以命令行执行getImg.php文件

cd /data/www/waf/captcha/
/usr/local/php/bin/php getImg.php

大概要生成一万个图片,可能需要花几分钟的时间。

四、修改nginx.conf配置文件

向http区块输入如下代码:

lua_package_path "/data/www/waf/?.lua";
lua_shared_dict guard_dict 100m;
lua_shared_dict dict_captcha 70m;
init_by_lua_file '/data/www/waf/init.lua';
access_by_lua_file '/data/www/waf/runtime.lua';
lua_max_running_timers 1;

记得要修改相关的路径。

五、配置HttpGuard

HttpGuard全部的配置项都在config.lua文件中,请根据以下文章修改配置文件。

https://www.lxconfig.com/thread-121-1-1.html

wget http://www.rfxn.com/downloads/bfd-current.tar.gz
tar zxf bfd-current.tar.gz
./install.sh
执行程序 —> /usr/local/bfd/bfd
BFD配置文件 —> /usr/local/bfd/bfd/conf.bfd
BFD ftp 规则 —> /usr/local/bfd/rules/proftpd

接下来我们打开BFD的配置文件,对密码错误尝试次数进行限制和配置使用什么防火墙封锁IP。

一、登入失败尝试次数限制

# how many failure events must an address have before being blocked?
# you can override this on a per rule basis in /usr/local/bfd/rules/
TRIG="5"

该设置意思为,登入失败五次执行封锁命令

二、封锁执行程序

如果使用APF防火墙默认即可,如果我们使用CSF作为防火墙,修改为

BAN_COMMAND="/usr/sbin/csf -d $ATTACK_HOST {bfd.$MOD}"

如果使用Iptables则修改为

BAN_COMMAND= "iptables -A INPUT -s $ATTACK_HOST -j DROP"

使用系统 route 命令, 丢弃该IP数据,则

BAN_COMMAND="route add -host $ATTACK_HOST reject"

三、启动BFD

/usr/local/bfd/bfd -q —> (安静输出)

/usr/local/bfd/bfd -s —–> (标准输出)

/usr/local/bfd/bfd -a ——> (尝试错误列表输出)

最后,检查防火墙黑名单文件,检查穷举IP是否被正确封锁。

/etc/csf/csf.deny
/etc/apf/apf.deny

参考:http://corpocrat.com/2010/01/02/preventing-brute-force-attacks-on-ftp-server/

为了减少一些误报,我们需要把 Directadmin 的一些值得信赖的服务添加CSF/LFD例外。编辑/etc/csf/csf.pignore 输入以下内容:

cmd:spamd child
exe:/bin/dbus-daemon
exe:/sbin/ntpd
exe:/usr/bin/dbus-daemon
exe:/usr/bin/dbus-daemon-1
exe:/usr/bin/fetchmail
exe:/usr/bin/freshclam
exe:/usr/libexec/dovecot/anvil
exe:/usr/libexec/dovecot/imap
exe:/usr/libexec/dovecot/imap-login
exe:/usr/libexec/dovecot/managesieve
exe:/usr/libexec/dovecot/managesieve-login
exe:/usr/libexec/dovecot/pop3
exe:/usr/libexec/dovecot/pop3-login
exe:/usr/libexec/gam_server
exe:/usr/libexec/hald-addon-acpi
exe:/usr/libexec/hald-addon-keyboard
exe:/usr/local/bin/clamd
exe:/usr/local/bin/freshclam
exe:/usr/local/bin/pureftpd_uploadscan.sh
exe:/usr/local/directadmin/dataskq
exe:/usr/local/directadmin/directadmin
exe:/usr/local/libexec/dovecot/imap
exe:/usr/local/libexec/dovecot/imap-login
exe:/usr/local/libexec/dovecot/pop3
exe:/usr/local/libexec/dovecot/pop3-login
exe:/usr/local/mysql-5.1.54-linux-x86_64/bin/mysqld
exe:/usr/local/php53/bin/php53
exe:/usr/local/php53/bin/php-cgi53
exe:/usr/local/php53/bin/php_uploadscan.sh
exe:/usr/local/php53/sbin/php-fpm53
exe:/usr/local/php54/bin/php54
exe:/usr/local/php54/bin/php-cgi54
exe:/usr/local/php54/bin/php_uploadscan.sh
exe:/usr/local/php54/sbin/php-fpm54
exe:/usr/local/php55/bin/php55
exe:/usr/local/php55/bin/php-cgi55
exe:/usr/local/php55/bin/php_uploadscan.sh
exe:/usr/local/php55/sbin/php-fpm55
exe:/usr/local/php56/bin/php56
exe:/usr/local/php56/bin/php-cgi56
exe:/usr/local/php56/bin/php_uploadscan.sh
exe:/usr/local/php56/sbin/php-fpm56
exe:/usr/local/sbin/nginx
exe:/usr/sbin/exim
exe:/usr/sbin/hald
exe:/usr/sbin/httpd
exe:/usr/sbin/mysqld
exe:/usr/sbin/mysqld_safe
exe:/usr/sbin/named
exe:/usr/sbin/nginx
exe:/usr/sbin/ntpd
exe:/usr/sbin/proftpd
exe:/usr/sbin/pure-ftpd
exe:/usr/sbin/sshd

然后重启LFD:

/etc/init.d/lfd restart

来自:https://www.plugins-da.net/info/csf-lfd-exceptions-for-directadmin-csf.pignore
p.s. Based on this thread: http://forum.directadmin.com/showthread.php?t=49424

#!/usr/bin/env python
#-*- coding: utf-8 -*-
#=============================================================================
#     FileName:
#         Desc:
#       Author: 苦咖啡
#        Email: voilet@qq.com
#     HomePage: http://blog.kukafei520.net
#      Version: 0.0.1
#      History:
#=============================================================================

import os
import sys
import re
import smtplib

#设定邮件
fromaddr = "smtp.qq.com"
toaddrs = ["voilet@qq.com"]
username = "voilet"
password = "xxxxxx"

#设置白名单
pass_file = ["api_ucenter.php"]

#定义发送邮件函数
def sendmail(toaddrs,sub,content):
    '发送邮件模块'
    # Add the From: and To: headers at the start!
    msg = ("From: %s\r\nTo: %s\r\nSubject: %s\r\n\r\n"
           % (fromaddr, ", ".join(toaddrs), sub))
    msg += content
    server = smtplib.SMTP('mail.funshion.com', 25,)
    server.login(username, password)
    server.sendmail(fromaddr, toaddrs, msg)
    server.quit()

#设置搜索特征码
rulelist = [
    '(\$_(GET|POST|REQUEST)\[.{0,15}\]\(\$_(GET|POST|REQUEST)\[.{0,15}\]\))',
    '(base64_decode\([\'"][\w\+/=]{200,}[\'"]\))',
    'eval\(base64_decode\(',
    '(eval\(\$_(POST|GET|REQUEST)\[.{0,15}\]\))',
    '(assert\(\$_(POST|GET|REQUEST)\[.{0,15}\]\))',
    '(\$[\w_]{0,15}\(\$_(POST|GET|REQUEST)\[.{0,15}\]\))',
    '(wscript\.shell)',
    '(gethostbyname\()',
    '(cmd\.exe)',
    '(shell\.application)',
    '(documents\s+and\s+settings)',
    '(system32)',
    '(serv-u)',
    '(提权)',
    '(phpspy)',
    '(后门)',
    '(webshell)',
    '(Program\s+Files)',
    'www.phpdp.com',
    'phpdp',
    'PHP神盾',
    'decryption',
    'Ca3tie1',
    'GIF89a',
    'IKFBILUvM0VCJD\/APDolOjtW0tgeKAwA',
    '\'e\'\.\'v\'\.\'a\'\.\'l\'',
]

def Scan(path):
    for root,dirs,files in os.walk(path):
        for filespath in files:
            isover = False
            if '.' in filespath:
                ext = filespath[(filespath.rindex('.')+1):]
                if ext=='php' and filespath not in pass_file:
                    file= open(os.path.join(root,filespath))
                    filestr = file.read()
                    file.close()
                    for rule in rulelist:
                        result = re.compile(rule).findall(filestr)
                        if result:
                            print '文件:'+os.path.join(root,filespath)
                            print '恶意代码:'+str(result[0])
                            print '\n\n'
                            sendmail(toaddrs,"增值发现恶意代码",'文件:'+os.path.join(root,filespath)+"\n" + '恶意代码:'+str(result[0]))
                            break

try:
    if os.path.lexists("/home/web_root/"):
        print('\n\n开始扫描:'+ "/home/web_root/")
        print('               可疑文件                 ')
        print('########################################')
        Scan("/home/web_root/")
        print('提示:扫描完成--~')
    else:
        print '提示:指定的扫描目录不存在--- '
except IndexError:
    print "请指定扫描文件目录"

来自:http://blog.kukafei520.net/html/2013/811.html