标签 Linux管理维护 下的文章

更新系统内核到最新

yum -y update

系统更新后,如果yum安装时提示错误信息,请执行以下命令修复.

rpm –import /etc/pki/rpm-gpg/RPM-GPG-KEY*

安装Apache,PHP,MySQL,以及扩展

yum -y install httpd php mysql mysql-server php-mysql httpd-manual mod_ssl mod_perl mod_auth_mysql php-mcrypt php-gd php-xml php-mbstring php-ldap php-pear php-xmlrpc mysql-connector-odbc mysql-devel libdbi-dbd-mysql

环境 CentOS 6.3 64bit

安装libunwind库(32位系统可省略次步)

wget http://download.savannah.gnu.org/releases/libunwind/libunwind-0.99-alpha.tar.gz

tar zxvf libunwind-0.99-alpha.tar.gz

cd libunwind-0.99-alpha/

CFLAGS=-fPIC ./configure

make CFLAGS=-fPIC

make CFLAGS=-fPIC install

安装Tcmalloc

wget http://gperftools.googlecode.com/files/gperftools-2.0.tar.gz

tar zxvf  gperftools-2.0.tar.gz

cd gperftools-2.0/

./configure

make && make install

echo "/usr/local/lib" > /etc/ld.so.conf.d/usr_local_lib.conf

/sbin/ldconfig

编译完成后,我们编辑mysqld_safe文件,加入Tcmalloc部分。

vi /usr/bin/mysqld_safe

# 找到# executing mysqld_safe,在下面加入:
export LD_PRELOAD=/usr/local/lib/libtcmalloc.so

# 保存,退出,重启MySQL。
service mysqld restart

检查是否加载成功,运行:lsof -n | grep tcmalloc
显示如下类似内容即Ok

mysqld 32573 mysql mem REG 9,3 13771446
/usr/local/lib/libtcmalloc.so.4.1.0 (path dev=0,53)

修改配置文件

运行:

vi /etc/my.cnf

全选替换为:

[mysqld]
datadir=/var/lib/mysql
socket=/var/lib/mysql/mysql.sock
user=mysql
# Disabling symbolic-links is recommended to prevent assorted security risks
symbolic-links=0

# 12/17/2013 Add
local-infile=0
skip-locking
query_cache_limit=1M
query_cache_size=32M
query_cache_type=1
max_connections=500
interactive_timeout=100
wait_timeout=100
connect_timeout=10
thread_cache_size=128
key_buffer=16M
join_buffer=1M
max_allowed_packet=16M
table_cache=1024
record_buffer=1M
sort_buffer_size=2M
read_buffer_size=2M
max_connect_errors=10
# Try number of CPU's*2 for thread_concurrency
thread_concurrency=2
myisam_sort_buffer_size=64M
server-id=1

[mysqld_safe]
log-error=/var/log/mysqld.log
pid-file=/var/run/mysqld/mysqld.pid
open_files_limit=8192

[mysqldump]
quick
max_allowed_packet=16M

[mysql]
no-auto-rehash
#safe-updates

[isamchk]
key_buffer=64M
sort_buffer=64M
read_buffer=16M
write_buffer=16M

[myisamchk]
key_buffer=64M
sort_buffer=64M
read_buffer=16M
write_buffer=16M

[mysqlhotcopy]
interactive-timeout

以上配置可根据自己服务器情况修改参数!
最后保存退出,运行 service mysqld restart 重启MySQL,完成。

查看httpd错误日记:/var/log/httpd/error_log

[Tue Dec 17 18:47:11 2013] [notice] Digest: done
Failed loading /usr/local/lib/ioncube/ioncube_loader_lin_5.3.so: /usr/local/lib/ioncube/ioncube_loader_lin_5.3.so: wrong ELF class: ELFCLASS32
eAccelerator: Could not allocate 67108864 bytes, the maximum size the kernel allows is 33554432 bytes. Lower the amount of memory request or increase the limit in /proc/sys/kernel/shmmax.
PHP Warning: [eAccelerator] Can not create shared memory area in Unknown on line 0
PHP Fatal error: Unable to start eAccelerator module in Unknown on line 0

知道问题就好办了

vi /etc/php.d/eaccelerator.ini

eaccelerator.shm_size 把值改成15(根据自己服务器配置修改)

# 按下 Esc 键退出编辑

:wq

#保存退出

本文内容转载:http://yzpanel.duapp.com/
需要更多详细内容,请访问原作者网站。

安装PHP加速器eAccelerator

yum install make
wget -c http://yzpanel.duapp.com/down/eaccelerator-0.9.6.1.tar.bz2
tar xjf eaccelerator-0.9.6.1.tar.bz2
cd eaccelerator-0.9.6.1
/usr/bin/phpize
./configure -enable-eaccelerator=shared -with-php-config=/usr/bin/php-config
make
make install
cd /
rm -rf eaccelerator-0.9.6.1
rm -rf eaccelerator-0.9.6.1.tar.bz2
mkdir /tmp/eaccelerator
chmod 777 /tmp/eaccelerator

cd /etc/php.d/

wget http://yzpanel.duapp.com/down/eaccelerator/Xen-eaccelerator.ini
mv Xen-eaccelerator.ini eaccelerator.ini

wget http://yzpanel.duapp.com/down/eaccelerator/OPENVZ-eaccelerator.ini
mv OPENVZ-eaccelerator.ini eaccelerator.ini

这一步二选择一即可,根据实际情况选择Xen架构就下载Xen-eaccelerator.ini;OPENVZ架构就下载OPENVZ-eaccelerator.ini

安装 ionCube

cd /
wget -c http://yzpanel.duapp.com/down/ioncube_loaders_lin_x86.zip
unzip ioncube_loaders_lin_x86
mv ioncube /usr/local/lib/
编辑文件/etc/php.ini 添加
zend_extension = "/usr/local/lib/ioncube/ioncube_loader_lin_5.3.so"

安装 Zend Guard Loader

cd /root
wget http://downloads.zend.com/guard/5.5.0/ZendGuardLoader-php-5.3-linux-glibc23-x86_64.tar.gz
sudo mkdir /usr/zend
tar -zxvf ZendGuardLoader-php-5.3-linux-glibc23-x86_64.tar.gz
sudo cp /root/ZendGuardLoader-php-5.3-linux-glibc23-x86_64/php-5.3.x/ZendGuardLoader.so /usr/zend/

编辑文件/etc/php.ini 
在zend_extension = "/usr/local/lib/ioncube/ioncube_loader_lin_5.3.so" 后面添加

zend_extension=/usr/zend/ZendGuardLoader.so
zend_loader.enable=1
zend_loader.disable_licensing=0
zend_loader.obfuscation_level_support=3
zend_loader.license_path=

安装完成之后 service httpd restart 重启httpd服务 然后用php -v查看是否安装成功

ZPanelcp是国外的虚拟主机控制面板,简单易用,界面美观,支持Debian,Ubuntu,CentOS,FreeBSD,Windows系统!官方有一键安装包,默认集成安装ProFTPD、MySQL、phpMyadmin、WebMail、DNS模块。占用内存也比较少,大概100M左右。官方有汉化语言包,还有很多的扩展模块,甚至有计费模块,如果要开展虚拟主机业务都不用买WHMCS了。如果有时间,接下来会接着发一些关于ZPanelcp的文章。

安装 - 环境 CentOS 6.3 64bit

wget http://www.zvps.co.uk/sites/default/files/downloads/centos-6-3/package/installer-x86_64-install.sh.x.tar.gz
tar -xf installer-x86_64-install.sh.x.tar.gz
chmod +x installer-x86_64-install.sh.x
yum install ld-linux.so.2
./installer-x86_64-install.sh.x

以上命令执行完成后会显示如下:

To contine please agree to the GPL license (y/n/q)? y (这里输入y同意许可协议)
Find your timezone from : http://php.net/manual/en/timezones.php e.g Europe/London
Enter Your Time Zone: Asia/Chongqing (这里输入Asia/Chongqing使用亚洲时区)
Install fresh ZPanel server or enter an upgrade version number e.g 10-1-0 :install (这里直接回车)
Enter the FQDN of the server (example: zpanel.yourdomain.com): (主机名默认即可这里直接回车,也可以输入)
Enter the Public (external) IP of the server: 输入IP (公网IP地址输入你的独立IP)
MySQL Password is currently blank, please change it now.
Password you will use for MySQL: 输入phpMyadmin管理密码 (mysql的root密码)
Re-enter the password you will use for MySQL: 再次输入输入phpMyadmin管理密码 (再次输入mysql的root密码)
ZPanel will now install, are you sure (y/n/q)? y (y开始安装)

完成以上操作后会自动进行安装,安装完成后会显示系统管理员密码,保存在 /root/passwords.txt 。之后访问服务器IP即可登入系统,用户是zadmin。

安装ZPanel中文汉化语言包

zppy repo add zpanel-packages.sammottley.co.uk
zppy update
zppy install ZXTS

在Server Admin->Module Admin下开启 在Administrator下打上勾

在Server Admin菜单下就能看到ZXTS了点击进入找到Mandarin -> Install or Update 进入安装下载 提示:Translations was added successfully

在My Account->Choose Language:选择Mandarin->Update Account 这里最好全都修改为你的信息因为如果Email不修改会报错不能保存。

安装K-File Manager文件管理器

zppy repo add rustus.txt-clan.com
zppy update
zppy install kfm

安装好后到模块管理勾选,允许用户使用。

来看看现在的样子吧。
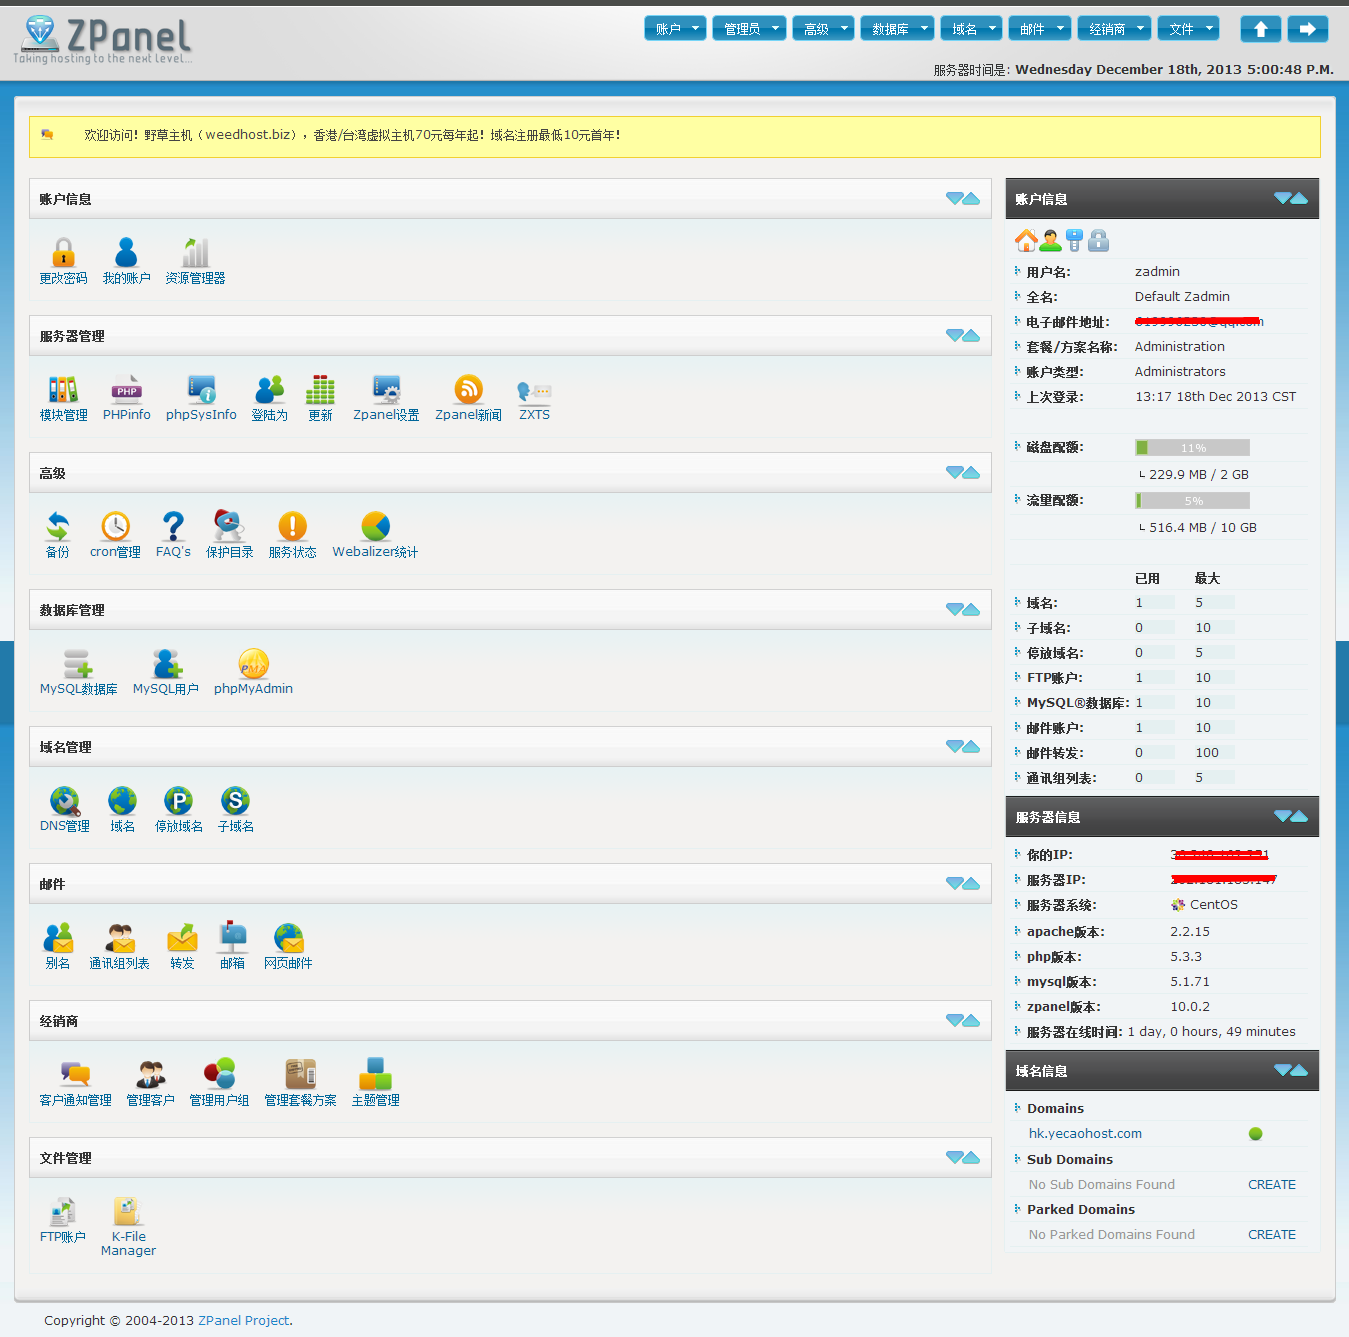
ZPanel

官方网站:http://www.zpanelcp.com/
官方论坛:http://forums.zpanelcp.com/index.php
张永鹏ZPanel的教程:http://yzpanel.duapp.com/

Google资料的时候,无意发现的,效果非常不错!
占用内存小(5M左右),适用多平台(OpenVZ可用)
单线程下载速度提升2-10倍,抽的时候效果更明显。拿了个拉斯维加斯的VPS测试,安装之前,联通6M单线程下载速度在50kb/s左右摇摆,启用后上升到400kb+

效果是不错的!不过作者也说了对于不加速就可以跑满带宽的类型来讲(多线程下载),开启后反而由于多出来的无效流量,导致速度减半。所以对于多线程/高速链路,这个方案是不适合的。

一键安装代码转载于hostloc的@lazyzhu
将如下代码保存为:net_speeder_lazyinstall.sh

#!/bin/sh
 
# Set Linux PATH Environment Variables
PATH=/bin:/sbin:/usr/bin:/usr/sbin:/usr/local/bin:/usr/local/sbin:~/bin
export PATH
 
# Check If You Are Root
if [ $(id -u) != "0" ]; then
    clear
    echo -e "\033[31m Error: You must be root to run this script! \033[0m"
    exit 1
fi
 
if [ $(arch) == x86_64 ]; then
    OSB=x86_64
elif [ $(arch) == i686 ]; then
    OSB=i386
else
    echo "\033[31m Error: Unable to Determine OS Bit. \033[0m"
    exit 1
fi
if egrep -q "5.*" /etc/issue; then
    OST=5
    wget http://dl.fedoraproject.org/pub/epel/5/${OSB}/epel-release-5-4.noarch.rpm
elif egrep -q "6.*" /etc/issue; then
    OST=6
    wget http://dl.fedoraproject.org/pub/epel/6/${OSB}/epel-release-6-8.noarch.rpm
else
    echo "\033[31m Error: Unable to Determine OS Version. \033[0m"
    exit 1
fi
 
rpm -Uvh epel-release*rpm
yum install -y libnet libnet-devel libpcap libpcap-devel gcc
 
wget http://net-speeder.googlecode.com/files/net_speeder-v0.1.tar.gz -O -|tar xz
cd net_speeder
if [ -f /proc/user_beancounters ] || [ -d /proc/bc ]; then
    sh build.sh -DCOOKED
    INTERFACE=venet0
else
    sh build.sh
    INTERFACE=eth0
fi
 
NS_PATH=/usr/local/net_speeder
mkdir -p $NS_PATH
cp -Rf net_speeder $NS_PATH
 
echo -e "\033[36m net_speeder installed. \033[0m"
echo -e "\033[36m Usage: nohup ${NS_PATH}/net_speeder $INTERFACE \"ip\" >/dev/null 2>&1 & \033[0m"

之后执行

sh net_speeder_lazyinstall.sh

项目作者:http://www.snooda.com/read/324
googe项目库:http://code.google.com/p/net-speeder/
本文部分参考: http://www.im1987.com/post/853.html

以CentOS系统为例,我们经常通过SSH连接到服务器或者VPS作业,编译程序需要比较长的时间,比如LNMP、DA等。如果此时网络突然断开连接,那就折腾了!我们可以安装Screen来预防这种情况,即使和远程服务器断开连接,编译依然会继续进行,我们重新连接后就可以恢复到原来的界面,也许已经安装完成了。

screen -S lnmp #创建一个screen会话,名称为 lnmp

如果提示找不到命令,我们可以运行安装命令:yum install screen

命令:

screen -ls #查看所有screen会话
快捷键 Ctrl+a+d 保存当前的screen会话,返回
exit #退出关闭screen会话
screen -wipe lnmp #删除名称为lnmp的会话
screen -r lnmp #恢复名称为lnmp的会话

一、CentOS 修改IP地址
修改对应网卡的IP地址的配置文件
# vi /etc/sysconfig/network-scripts/ifcfg-eth0
注意:用之前先看一下ifconfig,有的系统中,IP地址没有配在eth0上,配到eth1上,就要进行对应的修改修改以下内容

DEVICE=eth0 #描述网卡对应的设备别名,例如ifcfg-eth0的文件中它为eth0
BOOTPROTO=static #设置网卡获得ip地址的方式,可能的选项为static,dhcp或bootp,分别对应静态指定的 ip地址,通过dhcp协议获得的ip地址,通过bootp协议获得的ip地址
BROADCAST=192.168.0.255 #对应的子网广播地址
HWADDR=00:07:E9:05:E8:B4 #对应的网卡物理地址
IPADDR=12.168.1.2 #如果设置网卡获得 ip地址的方式为静态指定,此字段就指定了网卡对应的ip地址
IPV6INIT=no
IPV6_AUTOCONF=no
NETMASK=255.255.255.0 #网卡对应的网络掩码
NETWORK=192.168.1.0 #网卡对应的网络地址
ONBOOT=yes #系统启动时是否设置此网络接口,设置为yes时,系统启动时激活此设备

二、CentOS 修改网关
修改对应网卡的网关的配置文件
[root@centos]# vi /etc/sysconfig/network
修改以下内容
NETWORKING=yes(表示系统是否使用网络,一般设置为yes。如果设为no,则不能使用网络,而且很多系统服务程序将无法启动)
HOSTNAME=centos(设置本机的主机名,这里设置的主机名要和/etc/hosts中设置的主机名对应)
GATEWAY=192.168.1.1(设置本机连接的网关的IP地址。例如,网关为10.0.0.2)

三、CentOS 修改DNS
修改对应网卡的DNS的配置文件
# vi /etc/resolv.conf
修改以下内容
nameserver 8.8.8.8 #google域名服务器
nameserver 8.8.4.4 #google域名服务器

四、重新启动网络配置
# service network restart

# /etc/init.d/network restart

六、修改 IP 地址
即时生效:
# ifconfig eth0 192.168.0.2 netmask 255.255.255.0
启动生效:
修改 /etc/sysconfig/network-scripts/ifcfg-eth0
修改网关 Default Gateway
即时生效:
# route add default gw 192.168.0.1 dev eth0
启动生效:
修改 /etc/sysconfig/network
修改 DNS
修改/etc/resolv.conf
修改后可即时生效,启动同样有效
修改 hostname
即时生效:
# hostname centos1
启动生效:
修改/etc/sysconfig/network

参考:http://wuhuizhong.iteye.com/blog/780602

1:安装ipmitool

无论是centos,还是ubuntu都可以直接安装,源里都有

yum -y install ipmitool

apt-get -y install ipmitool

2:加载IMPI

http://wiki.adamsweet.org/doku.php?id=ipmi_on_linux

modprobe ipmi_msghandler
modprobe ipmi_devintf
modprobe ipmi_si

3:使用

查看ipmi信息

# ipmitool lan prinet

设置ipmi ipaddress

# ipmitool lan set 1 ipaddr 172.16.124.62

设置掩码

# ipmitool lan set 1 netmask 255.255.0.0

查看用户

# ipmitool user list 1
ID Name Callin Link Auth IPMI Msg Channel Priv Limit
2 ADMIN false false true ADMINISTRATOR

把管理员密码修改成 :chenshake
# ipmitool user set password 2 chenshake

参考:http://yyri.blog.163.com/blog/static/148943951201212364551621/

在Linux下glibc提供了我们事先编译好的许多timezone文件, 他们就放在/usr/share/zoneinfo这个目录下,这里基本涵盖了大部分的国家和城市

# ls -F /usr/share/zoneinfo/  
Africa/      Chile/   Factory    Iceland      Mexico/   posix/      Universal  
America/     CST6CDT  GB         Indian/      Mideast/  posixrules  US/  
Antarctica/  Cuba     GB-Eire    Iran         MST       PRC         UTC  
Arctic/      EET      GMT        iso3166.tab  MST7MDT   PST8PDT     WET  
Asia/        Egypt    GMT0       Israel       Navajo    right/      W-SU  
Atlantic/    Eire     GMT-0      Jamaica      NZ        ROC         zone.tab  
Australia/   EST      GMT+0      Japan        NZ-CHAT   ROK         Zulu  
Brazil/      EST5EDT  Greenwich  Kwajalein    Pacific/  Singapore  
Canada/      Etc/     Hongkong   Libya        Poland    Turkey  
CET          Europe/  HST        MET          Portugal  UCT  

在这里面我们就可以找到自己所在城市的time zone文件. 那么如果我们想查看对于每个time zone当前的时间我们可以用zdump命令

# zdump Hongkong  
Hongkong  Fri Jul  6 06:13:57 2007 HKT  

那么我们又怎么来告诉系统我们所在time zone是哪个呢?这里举例一种比较方便的

我们可以在/usr/share/zoneinfo下找到我们的time zone文件然后拷贝去到/etc/localtimezone(或者做个symbolic link)

我们想把time zone换成上海所在的时区就可以这么做

# ln -sf /usr/share/zoneinfo/posix/Asia/Shanghai /etc/localtime  
# date  
Fri Jul  6 06:35:52 CST 2007  

date是查看当前系统时间

第二种方法:

vi /etc/crontab
加上一句:
00 0 1 * * root rdate -s time.nist.gov
time.nist.gov 是一个时间服务器.

参考自:
http://www.linuxsir.org/bbs/thread307840.html
http://blueicer.blog.51cto.com/395686/116426